

Springer Miller Systems PMS
Is a DOS based system (originally derived from Hilton HPMS1 / HPMS2) with a Windows GUI front end. It is targeted to large resort properties. SMS is actually based on Foxpro (e.g. the DOS version of Foxpro) and not on Visual Foxpro (the Windows version). The Visual Foxpro part is a "wrapper" which they wrote to provide a GUI to the users. It actually just presents and collects data and then relays that back to the DOS program for the actual processing. The DOS program sends the print job directly to the port set in the windows printer driver. It does not use the windows driver, except to find the correct port.
Our current system for Springer Miller, called the "SmartDRIVER" installs on an existing 32 Bit Windows print server, and provides a second copy of each printer. The "EFPLUS…" copy of the printer will detect eForms print jobs from Springer Miller and will inject the form image from a file on the server.
Support is also available for eForms loaded into printer resident flash memory for some printer models, including the Hewlett Packard Laserjet M600 Series printers as well as other older models
| The ID numbers and codes to activate these forms are listed with our Standardized eForms ID List. |
eForms support is available from SMS for:
- folio / invoice / pre-checkout
- registration
- statement
- guest message
The Registration / Key Packet is not nativly supported by the SMS PMS, but can be supported via our SmartDriver.
eForms are in use at many of the finer SMS hotels including:
- Miramonte Resort in Palm Desert.
- The Argent Hotel
- The Mark, New York
- the Mandarin Oriental New York and Washington DC hotels
- Pointe South Mountain Resort
- The Royal Palms Resort and Spa
Setup notes:
1. All printer drivers should be PCL5e versions. E.g. not text only or PCL3, PCL4.
2. Install the software on the print server or local workstation. The server or workstation must be a 32 bit version of Windows.
3. Add a copy of each printer driver, using the same PCL5e driver (you should
be asked if you want to keep the existing files)
but with a NEW port of type EFPLUS_FPM configured to point to the original
printer. The setup wizard helps you do this automatically. The printer name
defaults to "EFPLUS" followed by the original name of the printer. For example,
if your original printer name was "HP FD LEFT" then the new printer would
be "EFPLUS HP FD LEFT".
The *EFPLUS printers should be set as the printer for the printing of any job where an eForm is required.
Ensure "Enable Advanced Printing Features" is unchecked under printer properties on the Advanced tab.
You should be able to print test pages. If not, run the tray program so you can see any error messages and correct issues. > The filter DLL doesn't log errors to the even que.
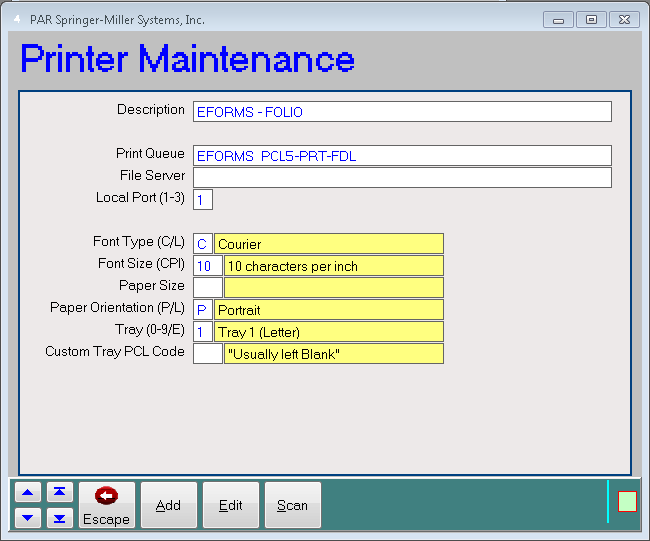
4. Add the new printer in SMS. From the main screen, click the "Configuration" button then double click "GENERAL | Printers/Queues Setup" then "Add" (press "Scan" to open a list of existing printers and and doubleclick to edit). On the "Printer Maintenance" screen, enter a Description of your own, leave Properties as is, and in the "Print Queue" line, enter the exact name of the printer from step 3. For example, if the new EFPlus printer is "EFPLUS HP FD LEFT" then add that exact name under "Print Queue". The name must be exactly the same, to the letter. Fill out the rest of the settings to match the original printer.

5. Configure SMS to send the print jobs to the EFORMS version of the printer rather than the original printer. From the Main Menu, go to User Settings, then select Set Default Printer. For each type of job you purchased an eForm to overlay, click on the "Set Default Printer for..." button and select the "EFPLUS ...." version of your printer. For example, if you have an eForm for Folio's, and your printer is "HP FD LEFT" assuming you setup "EFPLUS HP FD LEFT" then click on "Set Default Printer for Folio" and then select "EFPLUS HP FD LEFT".
6. Use the tray tool to start a "CJI Capture & Management" session. Verify the printer, then press "Capture CJI". Before the mode expires, go and print a sample job from the PMS system. Once the viewer appears, click "Save To Folder" and select a place to save it where you can find it later; e.g. "My Documents". Exit the capture mode and close our dialogs. Now you can send the .CJI file to us as an attachement on an email. We will examine the print job and find or verify appropriate triggers.
7. Work with our support desk to install the eForms images, and, if necessary, edit or replace the triggers.
Tray sizes must be set on printer front panel to match the stock loaded in each printer.
Contact Us | Privacy Policy | Return Policy
