


Electronic Forms Integration with Fidelio 6
A word of caution... making changes to any of these files *can* cause them to not print properly. Although the changes we make for eForms should be simple and easy to reverse, we suggest making a back up copy of the lang*.txt and lang*.mem files (the * being the wild card). Also make a copy of payreceipt.txt, melde.txt, and any other text files you will modify. This way if anything goes wrong, you can restore them.
First, you must have access to the Hotel Data or Front Office Setup and Configuration program (FSTAMM),
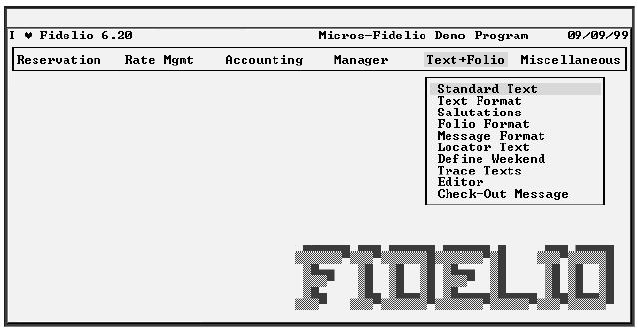
| Text and Folio: This section is used to handle all texts used by Fidelio. You can enter the Standard Text for any form letters (e.g., mailings, reservation confirmations, etc.) as well as the Text Format, which is used to define the layout to be used by the standard texts. |
From the "Text+Folio" menu, select "Standard Text"
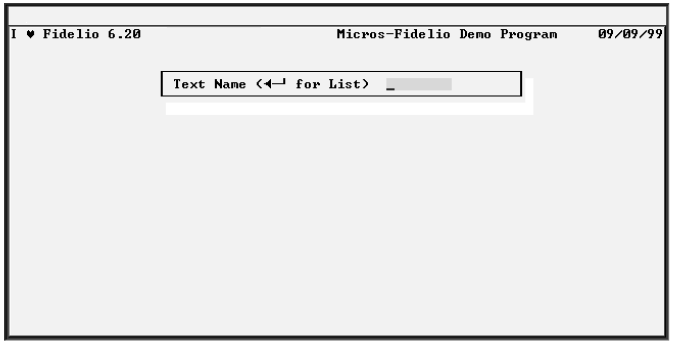
If you press [Enter], you will see a window showing all existing texts, from which you can select the one you want to view or edit.
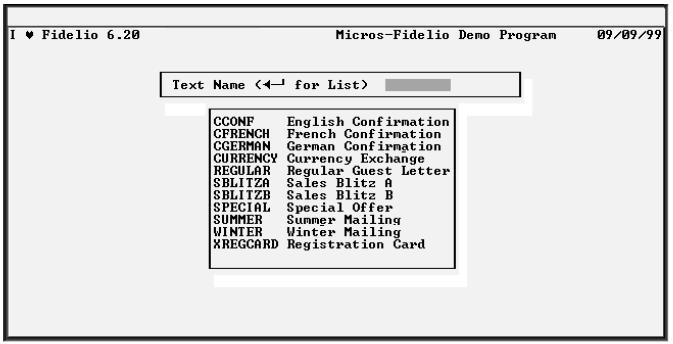
| Please note: You can create a new Registration Card format by typing in a new name but, you will have to enter the name of this form when you want to print the registration cards. In order to print a registration form for a single guest with the R Regcard option from the Reservation menu, you have to define the registration card with the text name MELDE here. |
Enter a new name or press enter to select the "Text" for which you wish to enable eForms. For the standard receipt, select PAYRECPT. For the standard registration, select MELDE.
You should now see the actual codes that print the "Text" you selected inside the Text Editor screen.

| Standard texts are interspersed with codes. There are two different types of codes available; star codes (two-character codes preceded by a star [*]) and substitution codes (dBASE expressions). eForms overlay codes could be inserted as a substitution code, but the Format menu gives us an even easier way. |
This is an example of a fairly straight forward confirmation letter, but any form will look something like this.
Select "Format" from the options at the bottom of the screen. A screen like the following one should appear:
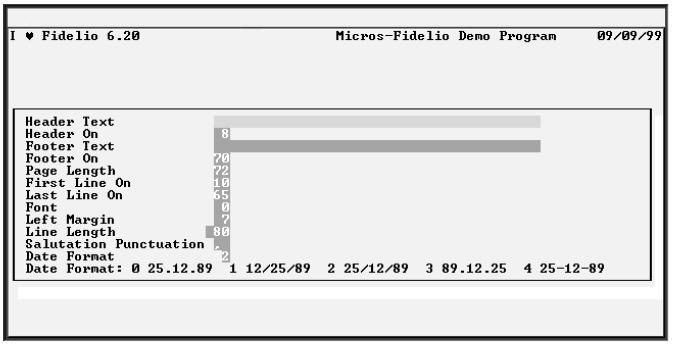
| Format. This defines the physical layout of the selected text. Each text uses the standard format (defined using the option Text Format). However, if you want to create an individual format for a specific letter or form (e.g., change the margins, the font, etc.), you can do it using this option. |
In the "Footer Text" line enter: (be sure to make the f and y lowercase and the X uppercase)
{chr(27) + ”&f##y3X”}
where ## is replaced with one of the following ID numbers:
| ID | Hotel Form Type | Note: This list shows all the possible eForms ID numbers. You may not have purchased or installed each of these on your system. If you do not have that eForm, only the data from Fidelio will print. Inserting the code with an ID for an eForm that is not present will not cause any problems, that eForm simply will not print. | |
|---|---|---|---|
| 21 | Folio | ||
| 22 | Receipt | ||
| 23 | Invoice | ||
| 31 | City Ledger Statements | ||
| 32 | Detail Statements | ||
| 41 | Registration Key Packets (prints on special stock) | ||
| 51 | Registration | ||
| 61 | Quick check out forms. (QCHKOUT) | ||
| 71 | Expense Report Detail pages | ||
| 81 | Expense Report Summary pages | ||
| 91 | Reservation Confirmations (CONF) | ||
| 92 | Itinerary | ||
| 101 | AP Checks | ||
| 111 | Travel Agent Checks | ||
Make sure that "Footer On" is set to a line between the "Page Length" and the "Last Line On"
Once you have completed your text, press [Esc] to exit the editor. You are asked if you want to save the changes and when you respond, you are returned to the text menu.
Changeing the eForm Overlay and the Page Format
If you wish to make other changes to the print setup, such as changing the tray selected or page size, you can move the code to the first line of the actual "Text" file starting from the very first character. E.g.
{ chr(27) + ”&l3a4H” + chr(27) + ”&f41y3X” }
This would setup the registration to print from the lower tray on legal sized stock (such as our Registration Key/Packet)
Troubleshooting:
If the eForms fails to print as expected, please feel free to contact
Electronic Forms Plus, Inc. It will help
us to help you if you would please fax a sample of the printout you
are getting with the problem areas circled. We will most probably help you
to perform the following test:
This test will absolutely verify if the problem is in the printer or the workstation:
- From the Command prompt type: EDIT TEST.PRN
- Hold down the Ctrl key and tap the P key. Release the Ctrl key and tap the Esc key. A left-pointing arrow should appear on the screen
- Type &f21y3X21 Take care to enter lower and uppercase letters as shown. Note: This would test the folio. To test another eForm, change the 21s to the ID number for that form. To test a standard (non-keypacket) registration, type &f51y3X51
- Press Ctrl-P then hold down the Alt key and, on the keypad, type 012 then release the Alt key.
- Save the file and exit Edit by pressing Alt-F, X, and Y or clicking File / Exit / Yes (or File / Exit and Enter.)
-
At the DOS command line, type:
COPY TEST.PRN PRN /B
or
COPY TEST.PRN LPTn /B
or
COPY TEST.PRN \\workstation\printername /B
where workstation is the name of the workstation that the printer is connected to, and printername is the name that the printer is shared as from that workstation. Note that network connected printers with IP addresses will not work, you need to share an IP connected printer from a workstation and copy the file to the \\workstation\printername.
The folio form should print. However,
-
If a page with 21 (and nothing else) in the upper left corner prints,
the problem is in the printer;
-
If you are using a SmartBOX,
-
ensure that it is installed as
per
http://www.efplus.com/box.htm then - Disconnect it from the printer and workstation cable and then from the power adapter cord.
- Ensure that the light on the SmartBOX goes out.
- Plug in the power adapter cord and ensure that the light is brightly lit.
-
Finally, re-attach the SmartBOX to the workstation and printer cables.
-
ensure that it is installed as
per
-
If you are using an internal memory chip, print the configuration page (see
the entry in
http://www.efplus.com/mssinst.htm for your printer model) and ensure that the chip is recognized by the printer.
-
Something is really wrong. Stop trying to fix it and
contact us for a review and
replacement.
-
If you are using a SmartBOX,
-
If a blank form prints, especially the hotel logo at the top, the eForm
is working. The problem must be in the setup of the Standard Texts
in Fidelio.
-
Ensure that the changes are actually making it into the "text": At the end
of the footer string, just after the X but before the quote, add the ID number
that you entered between the f and the y. E.g. {chr(27) +
”&f21y3X21”}. Save your change and re-print
the receipt, registration, etc... again. If you do not see the ID number
printed at the bottom of the page, make sure you are opening the correct
Standard Text file, and try moving the "Footer On" number closer to "Last
Line On".
-
If the form is printing but is incorrect in some way (layout, text, logo
incorrect) please fax a copy of the form showing the problem to us. Our fax
number is listed at
http://www.efplus.com
-
If nothing prints, investigate how the printer is connected to the workstation
and adjust the port in the copy command.
Batch registration
 Usually, you
will print your registration cards in a batch for all guests with a certain
arrival date (option Registration Forms from the Mailings menu
on the Reports section). The Regcard option is especially useful
for walk-in guests, where reservation and check-in take place at the same
time. After taking down the information from the guest, simply press [R]
and confirm that you want to print and Fidelio will print the registration
card for this guest.
Usually, you
will print your registration cards in a batch for all guests with a certain
arrival date (option Registration Forms from the Mailings menu
on the Reports section). The Regcard option is especially useful
for walk-in guests, where reservation and check-in take place at the same
time. After taking down the information from the guest, simply press [R]
and confirm that you want to print and Fidelio will print the registration
card for this guest.
Please note: This option only works if you have defined the registration card with the text name MELDE in the Standard Text option in the setup program. If you have another registration card layout that you manually select when printing batch registrations, you must copy that text to the MELDE.txt file before you can use it to print walk-in registrations.
If you are using a special size stock, be sure to feed it with the narrow edge into the printer first. And slide the guides on the printer feed in to the center to touch and guide the stock on both sides
Please contact us at any time if you have any questions, comments or concerns.
Questions:
Comments:
-
tariq_salah_8@hotmail.com
ineed to print from fidelio but icant do it imake to send to printer but nothing response and no error plz ineed to help as soon as (iam using hp laser jet1000 with usb cable)
James Newton of Massmind replies: USB connected printers will not work with DOS programs. You need a parallel connection.
Contact Us | Privacy Policy | Return Policy