


Installing Flash SIMMs in the Hewlett Packard 4V
General Information
Your HP LaserJet printer has four SIMM (Single In-line Memory Module) slots. Use them to install additional printer memory and printer personalities (such as the Flash SIMM).
The HP LaserJet 4V printer comes with 4 MBytes of volatile RAM memory and can be expanded to 68 MBytes.
The HP LaserJet 4MV printer contains 12 MBytes of volatile RAM memory. By adding optional 1, 2, 4, 8, or 16 MByte SIMMs you can increase memory to a total of 44 MBytes.
Note: RAM Memory SIMMs for the HP LaserJet 4 Plus and 4M Plus printers can be used in the HP LaserJet 4V and 4MV printers. PostScript language SIMMs for the HP LaserJet 4 Plus and 4M Plus printers cannot be used in the HP LaserJet 4V and 4MV printers. Flash SIMMs for the HP LaserJet 4P and 4MP printer can be used in the HP LaserJet 4V and 4MV printers if the blue jumper on the Flash SIMM is replaced before the SIMM is installed in the HP LaserJet 4V or 4MV.
CAUTION
SIMM boards and your printer controller board can be damaged by small amounts of static electricity. Wear an antistatic wrist strap or touch the surface of the antistatic package before touching a board. When handling a board, wear an antistatic wrist strap or frequently touch the antistatic bag or bare metal on the printer.
-
In this order, switch the printer OFF (A) and unplug the power cord
(B) and any attached cables (C).
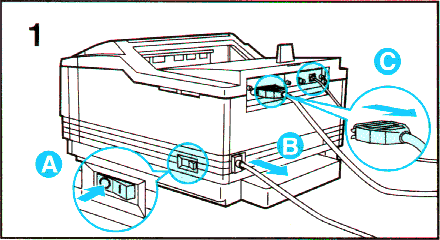
-
Loosen (do not remove) the two captive screws.
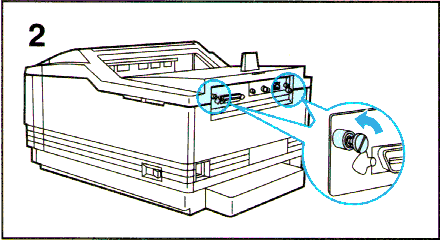
-
Grasp the screws and pull the printer's controller board out of the printer.
Place it on a flat, non-conductive surface. (For ease of replacement, note
how the board fits into slots in the printer.)
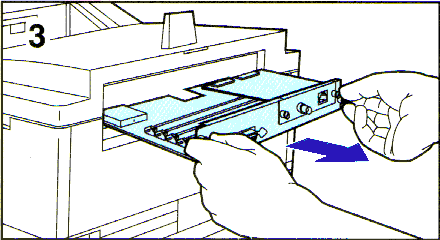
-
Remove the SIMM board from the antistatic package. Hold the board with your
forefingers on the side edges and your thumbs against the back edge, so the
notch on one end is on the right and the metal teeth face toward the SIMM
slot.
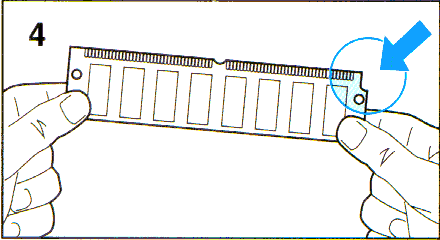
-
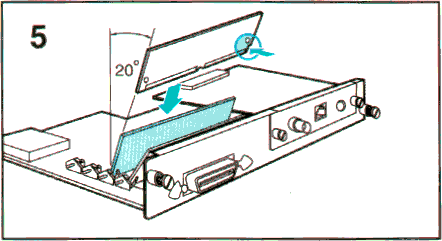
Insert the board firmly into the SIMM at about a 20-degree angle. Use the
closest open slot toward the back of the printer.
-
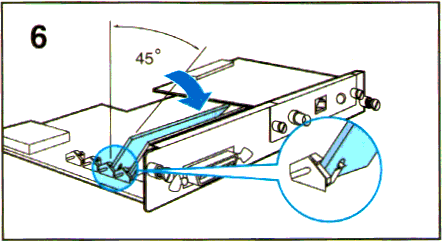
Rotate the SIMM toward the back of the printer to about a 45-degree angle
until it clicks into the metal locking tabs. If it is properly seated, it
will not lift away from the slot. (To remove a SIMM, you must first release
the metal locking tabs.)
-
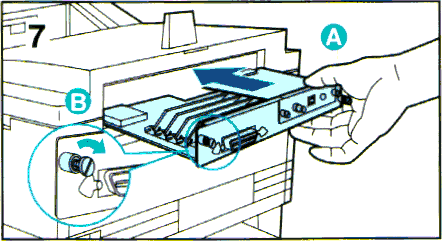
Slide the printer controller board back into the printer (A) and tighten
the two screws (B).
-
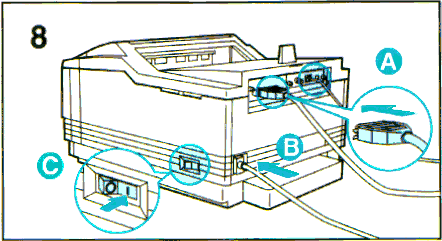
Reattach any cables (A) and the power cord (B), then switch
the printer ON (C).
Test the SIMM by sending the PCL codes to call the images on the SIMM if it has previously been programmed.
Contact Us | Privacy Policy | Return Policy
