


HP LaserJet 5000 Printer Family - Memory (DIMM) Installation
Table of Contents
Overview
-
The printer has three dual in-line memory module (DIMM) slots for upgrading
with:
- More printer memory. DIMMs are available in 4, 8, 16, and 32 MB, for a maximum of 100 MB.
- Flash memory DIMMs, available in 2 and 4 MB. Unlike standard printer memory, flash DIMMs can be used to permanently store downloaded items in the printer, even when the printer is off.
- DIMM-based accessory fonts, macros, and patterns.
-
Other DIMM-based printer languages and printer options.
NOTE: Single in-line memory modules (SIMMs) used on previous HP LaserJet printers are not compatible with the printer.
You might want to add more memory to the printer if you often print complex graphics or PS documents, print with the optional duplexer, use many downloaded fonts, print at ProRes 1200, or print large paper sizes (such as A3, B4, or 11 x 17).
To find out how much memory is installed in the printer, or to find out what is installed in the EIO slots, print a configuration page.
Installing Memory
CAUTION: Static electricity can damage dual in-line memory modules (DIMMs). When handling DIMMs, either wear an antistatic wrist strap or frequently touch the surface of the DIMM's antistatic package, then touch bare metal on the printer.
If you have not already done so, print a configuration page to find out how much memory is installed in the printer before adding more memory.
-
Turn the printer off. Unplug the power cord and disconnect any cables. (If
an optional duplexer is installed, you will need to remove the rear section
and the cable tray first. Go to "If an Optional Duplexer
is Installed," below and after the duplexer is out of the way, return
here.)

-
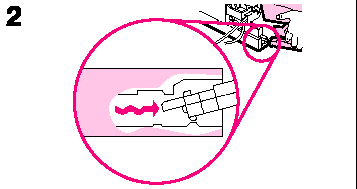
Loosen the two captive thumb screws on the back of the printer.
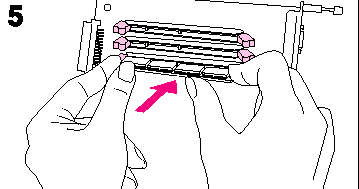
-
Grasp the screws and pull the formatter board out of the printer. Place it
on a flat, non-conductive surface.

-
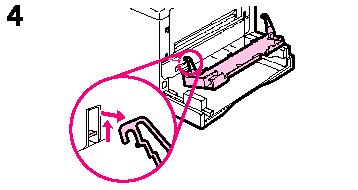
Remove the DIMM from the antistatic package. Hold the DIMM with fingers against
the side edges and thumbs against the back edge. Align the notches on the
DIMM with the DIMM slot. (Check that the locks on each side of the DIMM slot
are open, or outward.)

-
Press the DIMM straight into the slot (press firmly). Make sure the locks
on each side of the DIMM snap inward into place. (To remove a DIMM, the locks
must be released.)
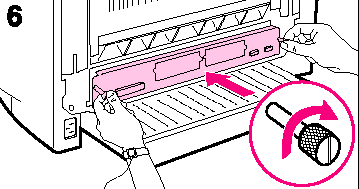
-
Slide the formatter board back into the printer and tighten the two screws.
-
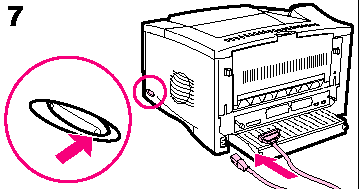
If an optional duplexer is installed, reattach the cable tray and the rear
section of the duplexer. Reattach any interface cables, and the power cord.
Turn the printer on and test the DIMM. (Go to "Checking
Memory Installation," below.)
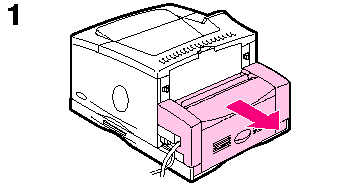
If an Optional Duplexer is
Installed
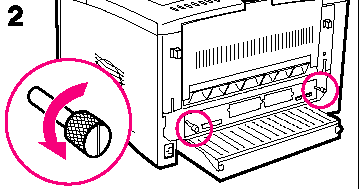
-
Slide the rear section of the duplexer away from the printer.
-
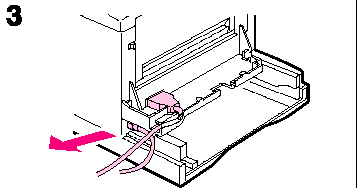
Remove the rear section of the duplexer by lifting and rotating the rear
section to clear all of the tabs in the grooves.
-
Unplug the power cord and disconnect any cables.
-
Remove the cable tray by lifting it out of position.
- Go back to Step 2, under "Installing Memory," above.
NOTE: Reverse these steps to install the cable tray and the rear section of the duplexer. Make sure the cable tray is properly installed and the cables are routed through the left side.
Checking Memory Installation
Follow this procedure to verify that DlMMs are installed correctly:
- Check that the printer's control panel displays READY when the printer is turned on. If an error message appears, a DIMM might have been incorrectly installed. Check the printer messages section of the printers users manual.
- Print a new configuration page.
- Check the memory section on the configuration page. and compare it to the configuration page. printed before the DIMM installation. If the amount of memory has not increased, the DIMM might not be installed correctly (repeat the installation procedure) or the DIMM might be defective (try a new DIMM).
Configuration Page
Use the configuration page to view current printer settings, to help troubleshoot printer problems, or to verify installation of optional accessories, such as memory (DlMMs), paper trays, and printer languages. If an HP JetDirect print server card is installed (HP LaserJet 5000 N/5000 TN printers), a JetDirect configuration page will print out as well.
To print a configuration page:
- Press [Menu] until INFORMATION MENU appears.
- Press [Item] until PRINTER CONFIGURATION appears.
- Press [Select] to print the configuration page.
File Directory
Use the file directory page to view current contents of the SmartFlash DIMM
To print a configuration page:
- Press [Menu] until INFORMATION MENU appears.
- Press [Item] until PRINT FILE DIRECTORY appears.
- Press [Select] to print the configuration page.
Note which FSA device number the DIMM is listed under. If the DIMM is the only FSA device installed in the printer (no hard drive or second SmartFlash DIMM), it should be device 0. Use this device number when selecting the storage device in the TransForm software to program forms to the DIMM.
Adjusting Memory Settings
Resource Saving
Resource Saving allows the printer to keep downloaded resources (permanent downloaded fonts, macros, or patterns) in memory when the printer language or resolution is changed.
If you do not have an optional hard disk or flash DIMM for storing downloaded resources, you might want to change the amount of memory allocated to each language when downloading an unusually large number of fonts, or if the printer is in a shared environment.
The minimum amount of memory that can be allocated to Resource Saving is 400 KB each for PCL and PS.
To determine how much memory to allocate to a language:
- From the Configuration Menu, set RESOURCE SAVE=ON. You might need to add memory to the printer in order for this option to appear in the printer's control panel.
- Also from the Configuration Menu, choose either PCL MEMORY or PS MEMORY and change the setting to the highest value displayed. This amount will vary depending upon how much memory is installed in the printer.
- Using a software application, download all the fonts you want to use in the selected language.
- Print a configuration page. The amount of memory used by the fonts is listed next to the language. Round this figure up to the nearest 100 KB. (For example, if 475 KB are shown, 500 KB should be reserved.)
- From the Configuration Menu, set PCL MEMORY or PS MEMORY to the value determined in step 4.
- Repeat step 3. (You must download all fonts again. See the note below.)
NOTE: When you change the Resource Saving setting, all downloaded resources (such as fonts or macros) will need to be downloaded again, unless they are stored on an optional hard disk or flash DIMM.
I/O Buffering
To allow the computer to continue working without waiting for the print job to finish queuing, the printer uses a portion of its memory (an I/O buffer) to hold jobs in progress. (If I/O buffering is off, no memory is reserved for this function.)
In most cases, it is best to let the printer automatically reserve memory for I/O buffering. (For each megabyte of memory added to the printer, 100 kilobytes are reserved.)
To speed network printing, you might want to increase the amount of memory reserved for I/O buffering.
To change the I/O Buffer setting:
- From the I/O Menu, set I/O BUFFER=ON.
- Also from the I/O Menu, set I/O SIZE to the desired value.
NOTE: When you change the I/O Buffer setting, all downloaded resources (such as fonts or macros) will need to be downloaded again, unless they are stored on an optional hard disk or flash DIMM.
Contact Us | Privacy Policy | Return Policy