


Infoprint 1222 Setup Guide
Install memory cards
CAUTION! If you are installing memory cards sometime after setting up the printer, turn the printer off and unplug the power cord before continuing. |
Your printer has two memory connectors for optional memory cards. You
can install any combination of printer memory and flash emory cards in the
connectors. However, the printer only recognizes one flash memory card at
a time.
You need a small Phillips screwdriver to install memory cards. |
|
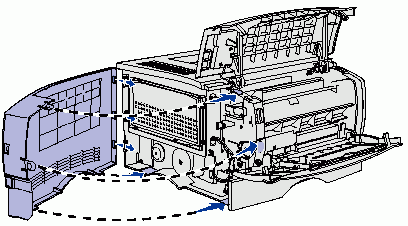
Removing the side cover |
||
 |
1 Open the upper front door and the multipurpose feeder door. | |
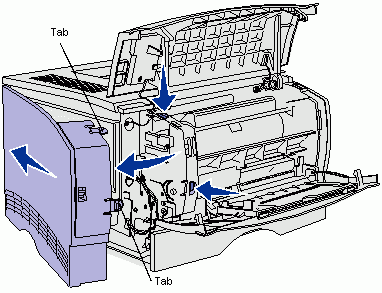 |
2 Firmly press on the two tabs simultaneously to free them from
their slots.
3 Slide the side cover off of the back of the printer as you swing it out to remove it. 4 Set the cover aside. |
|
Removing the shield |
||
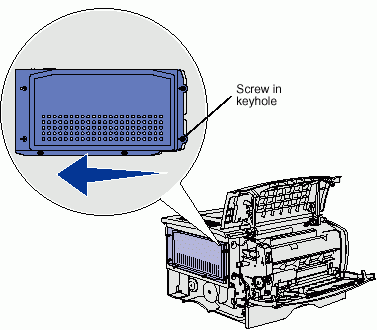 |
1 Loosen the six screws. Do not remove them completely.
2 Slide the shield to the left until the screws fit into the keyholes on the cover. 3 Pull the shield straight out, and set it aside. |
|
Installing a memory card
Warning! Memory cards are easily damaged by static electricity. Touch something metal on the printer before you touch a card. |
Follow the instructions in this section to install either a printer memory card or a flash memory card. Memory cards must have 100-pin connectors. | |
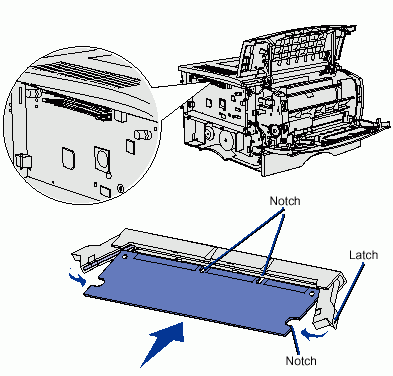 |
1 Unpack the memory card.
Avoid touching the connection points along the edge of the card. Save the packaging. 2 Push open the latches on both sides of the memory connector you want to use. 3 Align the notches on the card with the notches on the connector. 4 Push the memory card firmly into the connector until the latches on either end of the connector snap into place. Don't use the latches to lock in the card, push the card in and let the latches come up on their own. It may require some force to fully seat the card. If necessary, push with your thumbs to the point that they almost start to hurt. 5 Make sure each latch fits over the notch on the end of the card. |
|
Reattaching the shield |
After installing your memory cards, you must reattach the shield. | |
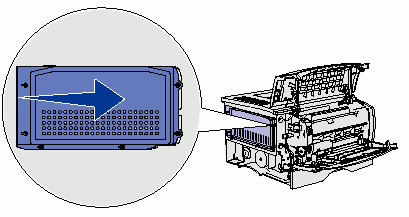 |
1 Align the six keyholes on the shield with the six screws on
the system board.
2 Press the shield against the system board, and then slide the shield to the right. 3 Tighten the six screws. |
|
Reattaching the side cover |
||
 |
1 Align the three rear tabs on the side cover with the corresponding
slots on the printer.
2 Guide the tabs on the top, bottom, and front of the cover into their corresponding slots. The top and front tabs snap into place. 3 Close the upper front door and the multipurpose feeder door. Make sure both doors snap closed on both sides. |
|
Contact Us | Privacy Policy | Return Policy